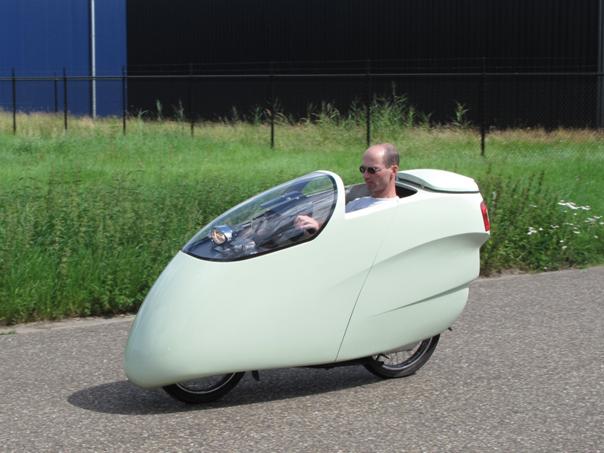
My feetforward motorbike
Last update: aug-15-2010
DEZE SITE IS OOK IN HET NEDERLANDS TE BEKIJKEN OP: www.velomobiel.nl/allert


THE BIKE THE DREAM THE RESULT
What difference does the streamline make?
Summer is here again, now is the time to ride comfortable and fuel economical. I rode a tour together with a stock Innova rider just to determine the difference in fuel consumption that the streamline would make. Riding together ensures us to ride the same route under the same weather end traffic conditions with the same speed and acceleration.
Sunny weather, 80F, little wind, a 3 mile traffic jam on the highway, got stopped by the police once.
A distance of 165miles total (according to GPS) 25 miles on the highway the others on local roads, average speed of 37mph.
Fuel consumption stock Innova: 130mpg
Fuel consumption streamline Innova: 221mpg
Considering our low average speed I did not expect the difference in fuel consumption to be so big. Air resistance seems to be a major factor even at low speeds and becomes relatively more important at higher speeds.
For the record; both bikes have the stock PGM-FI type engine, the only difference is the taller gearing of the streamliner.
After we did this first ride on local roads we were curious about the difference in fuel consumption on the highway at a steady speed of about 55mph.
Therefore we rode again this time with cloudy weather, an occasional mild shower, little wind and 65F.
We did 60 miles one way, turned and rode the same highway back.
Total distance 127 miles according to GPS, this is 2% more than the mile counter of the Innova recorded, so it has actually been doing 2% better mileage all the time.
Average speed according to GPS 53mph
Fuel consumption stock Innova: 113mpg
Fuel consumption streamlined Innova: 237mpg
The streamline more than doubled the mileage of the bike at that speed. And this was the first time that I managed to get to the magic number of 100km to 1litre (235mpg) riding about 85mph. This ride proves it is possible in favourable conditions.
And yes, we took care not to draft behind trucks, no cheating.
The latest changes on my motorbike.
It is winter 2010, snow and freezing temperatures stopped me riding the motorbike, but I can do some work on the details.
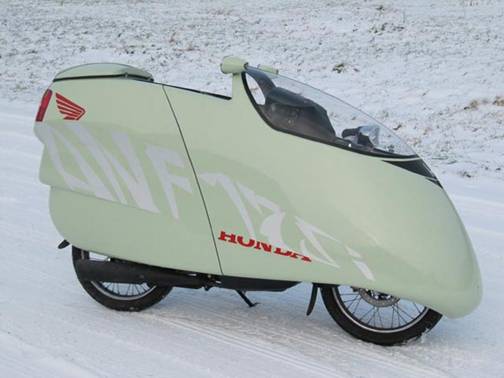
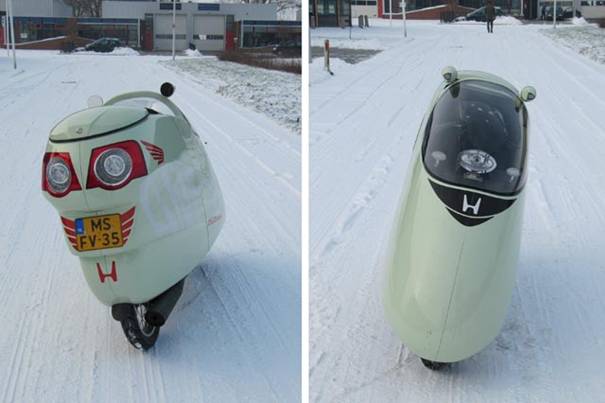
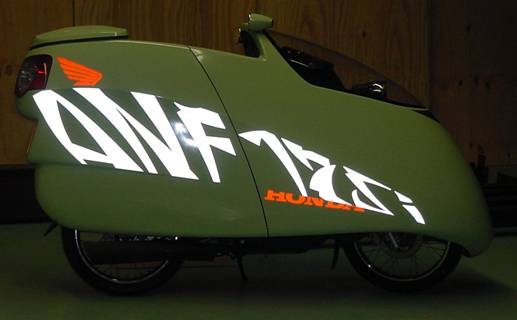
I have added a striping on the to big green surface, it is made of retro reflecting material and reveals what kind of motorbike is inside the streamline.
I have also made some cones to the mirrors with build in indicator lights.
From a scale model to a real streamline
Here you can read a story about building a streamline to fit my Honda Innova 125i.
But first I present you a list of mpg and some background information with it.
When viewing the list please note that the first 1000km have been ridden slowly because of the brand new engine. After that I rode it faster, therefore the 107 to 122mpg of the standard bike may be compared to the figures below these.
|
|
km |
liters |
|
km per liter |
liter per 100km |
MPG(US) |
|
|
|
0 |
|
|
|
|
|
|
|
|
80 |
vol/filled up |
|
|
|
|
|
|
|
519 |
7,18 |
|
61,1 |
1,63 |
143 |
|
|
|
705 |
3,07 |
|
60,5 |
1,65 |
142 |
|
|
|
865 |
2,89 |
|
55,4 |
1,8 |
130 |
|
|
|
986 |
2,64 |
|
45,8 |
2,18 |
107 |
|
|
|
1107 |
2,34 |
|
51,7 |
1,93 |
122 |
|
|
|
|
|
|
|
|
|
|
|
|
1289 |
vol/filled up |
|
|
|
|
|
|
|
1611 |
5,09 |
|
63,2 |
1,58 |
149 |
|
|
|
2060 |
7,95 |
|
56,6 |
1,77 |
142 |
|
|
|
2442 |
6,01 |
|
63,6 |
1,57 |
150 |
|
|
|
2914 |
6,59 |
|
71,6 |
1,39 |
168 |
|
|
|
3356 |
6,1 |
|
72,6 |
1,37 |
171 |
|
|
|
3782 |
6,22 |
|
68,5 |
1,45 |
161 |
|
|
|
4348 |
9,38 |
|
60,3 |
1,59 |
142 |
|
|
|
|
|
|
|
|
|
|
|
|
4734 |
4,39 |
|
87,9 |
1,14 |
207 |
|
|
|
5131 |
4,79 |
|
82,9 |
1,21 |
195 |
|
|
|
5392 |
2,87 |
|
90,9 |
1,1 |
214 |
|
|
|
5975 |
7,22 |
|
80,7 |
1,24 |
190 |
|
|
|
6598 |
7,55 |
|
82,5 |
1,21 |
194 |
|
|
|
7179 |
7,25 |
|
84,3 |
1,18 |
198 |
|
|
|
7331 |
1,83 |
|
83 |
1,2 |
195 |
|
|
|
7590 |
2,81 |
|
92 |
1,09 |
216 |
|
|
|
7777 |
2,33 |
|
80 |
1,25 |
188 |
|
|
|
7976 |
2,01 |
|
99 |
1,01 |
233 |


BUILDING THE STREAMLINE
Why?
As a designer and rider of faired recumbent bicycles, I have enjoyed the benefits of reduced air resistance.
It makes cycling more energy efficient and allows you to travel faster over greater distances.
A recumbent riding position is more comfortable, while adding a fairing can provide weather protection as well as speed.
If one can decrease aerodynamic drag and at the same time improve comfort and energy efficiency of a bicycle, imagine what might be possible with a faster vehicle.
If a vehicle is faster the aerodynamic drag becomes more important.
If you ride twice as fast rolling resistance becomes twice as big but the aerodynamic drag increases exponentially with velocity.
Possibilities
With the design of the Quest velomobile I have optimized my bicycle and it worked out very well, my daily commute is a pleasure.
This successful aerodynamic design made me wonder, can I redesign any other vehicle to serve my personal needs better?
A car maybe?
The automobile design should in my opinion be much more like a velomobile. Lighter, more streamlined, less power needed and much better fuel economy.
To build my own car design is tempting but to much trouble. There are too many rules and regulation regarding safety, emissions, parking, taxes and so on. The car is transportation for the masses, it became so successful that it now gets stuck in traffic jams and it is hard to find parking space.
But I would still like to have a motor vehicle of my own design which is fast enough to use on highways. To travel long distances when I do not use my bicycle.
What about a motorbike?
A motorbike is much less affected by traffic jams, parking problems and safety regulations. Only a crash helmet is needed.
You are allowed to make major changes to your motorbike. If you just do not change the wheelbase, engine and brakes, you can change seat position and fairing parts drastically.
It is less expensive and its smaller size makes it easier to work with.
So my vehicle of choice is the motorbike. I have always owned a motorbike since my 18th birthday and I like them for their simple construction and technique.
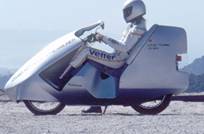
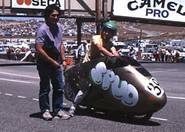
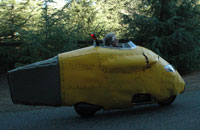
I did get inspired when reading the Craig Vetter website about his fuel economy contests from 1980 to 1985.
He was a pioneer in designing fairings for motorbikes.
Take a look at: http://www.craigvetter.com
If streamlining can do so much for comfort, speed and fuel economy why do you not see real aerodynamically streamlined motorcycles on the road?
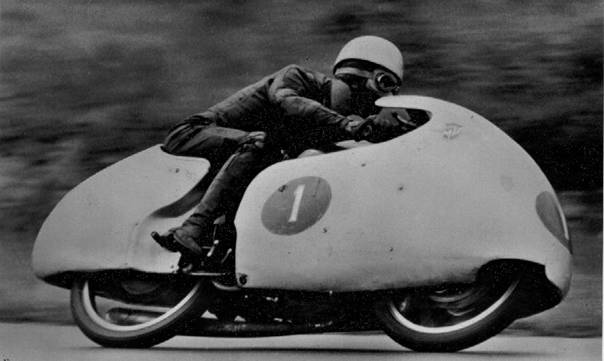
In the 1950s racing motorbikes got more streamlined, that made them much faster and more accidents happened. The tracks, tires and brakes could not handle the higher speeds. To prevent accidents the Fédération Internationale de Motocyclisme banned streamlining.
It is a pity this decision was made, motorcycles might have looked very different today if it had not been for this decision.

My goal
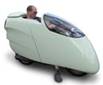
I want to build a one person motorbike with excellent weather protection, comfortable seating position and luggage space big enough to store a helmet.
A small engine providing just enough power to keep up with traffic will make it very fuel economic, 1liter per 100km (235 mpg(US) is my aim.
Such a streamlined two wheeler can not be ridden in very windy conditions; I can accept this limitation as I will only use it occasionally.
What can be done?
If you start tot think about it you will see much more potential to make aerodynamic improvements on a motor bike as on a car or a bicycle.
The cyclist lacks the power to reach a cruising speed where almost all resistance he meets is induced by aerodynamic drag.
The car has a much bigger frontal area but a much better streamline and its higher weight increases rolling resistance, therefore the rolling resistance is still a major factor at 55mph.
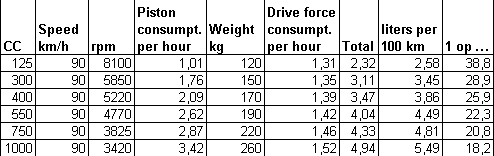
The average motorbike though is relatively light and has a very bad aerodynamic shape, at 55mph 90% of all resistance is due to aerodynamic drag and only 10% to rolling resistance. Reducing air resistance on a motorbike is very effective.
|
|
|
|
|
|

Which engine?
An electric motor is the best option; it is silent, lightweight, and efficient and has a lot of torque. But I would like to use this motorbike to travel long distance. Therefore I can not use an electric motor and batteries, the batteries that are available today can not store enough energy. Maybe some day, if battery technique improves, the electric motorbike will be the best option.
I will use a motorbike with a combustion engine that runs on petrol; diesel motorbikes are hardly commercially available.
A combustion engine is in fact an air pump/compressor, compressing more air takes more energy. If your engine has more displacement and power than you need, that displacement and power, although your not using it, will still consume petrol.
Therefore it has to be a small and light engine; less weight also means better acceleration and less rolling resistance. I found this to illustrate the theory on: http://www.home.zonnet.nl/Stroetmann44/second.htm
The bike
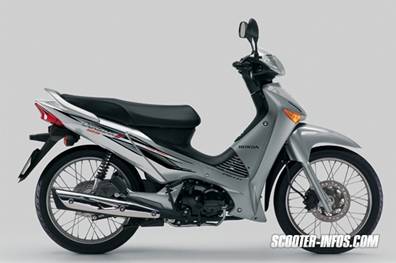
After comparing lots of specs from lots of small motorbikes and scooters I chose the Honda Innova a.k.a. ANF125i. Although it is incredibly popular in Asia, it is not imported in the Netherlands.
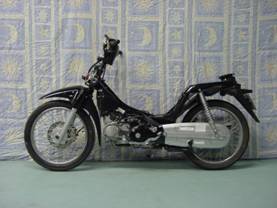
August 2007 I have bought one in Belgium and rode the stock bike for 1000km.
If you take a look at the specs, it is designed to be reliable and fuel efficient.
A 125cc engine, max torque at 3000rpm, 6.85Kw (9hp) at 7000rpm, valve timing with hardly any overlap.
The fuel injection and catalytic converter make it clean. No belt drive, its gearbox and enclosed chain drive are more efficient, low maintenance and easy to gear up by using different sprockets. Large 17inch wheels make it handle better and bring down rolling resistance. It weighs only 100kg and is the cheapest Honda motorbike.
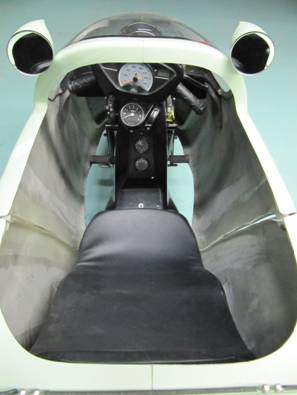
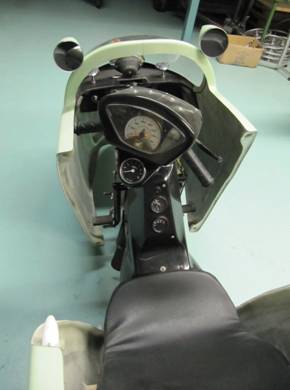
The frame seems to be designed to accommodate a comfortable recumbent seat.

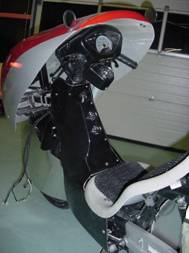
To achieve the smallest possible frontal area I have positioned the footrest above the front wheel.
Start of the transformation
Winter 2007
This summer I have ridden several thousands of kilometres, at first with the stock scooter, later with the modified feetforward.
As you can see in the pictures a lot of modifications have been made.
Evaluation of the first kilometres
Spring and summer 2008
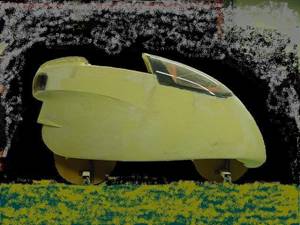
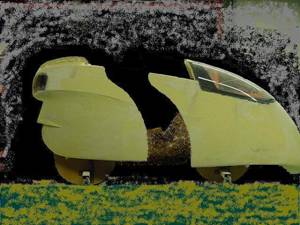
As soon as it was in a rideable condition I took it for a top speed test. An increase in top speed indicates less air resistance and fuel consumption. Aerodynamic drag is a product of frontal area (Fa) and streamline of the body (Cd).
The body streamline has not improved much by adding only a nosecone but Fa has decreased by almost 40%, this makes the top speed go up from 90 kmh (56mph) to 110 kmh (69mph).
Fuel consumption has gone down from 45l/km (2,22l/100km 106mpg) at 90kmh (56mph) to 60l/km (1,66l/100km 141mpg)
The speedometer has been corrected with a speedohealer and calibrated with a bicycle computer, fuel consumption is estimated on the basis of several refills after riding a considerable distance at approximately 56mph.
The changes in top speed and mpg where as to be expected after reduction of Fa by 40% and Cd remaining unchanged.
Where ever mpg is mentioned it is based on US gallons.
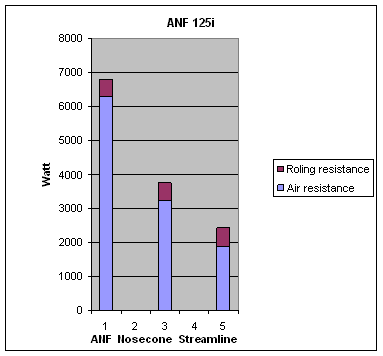
Looking at the resistance at 55mph graph above, the streamline requires only 2400watt to go 55mph.
To make the maths easy I used http://www.analyticcycling.com/ForcesPower_Page.html
Streamline; Fa 0.7, Cd 0.3, Mass 220kg, Cr0.01, speed 24.5m/s
Motorbike; Fa 0.7, Cd 1.0, Mass 200kg, Cr0.01, speed 24.5m/s
Small car; Fa 1.7, Cd 0.3, Mass 900kg, Cr0.01, speed 24.5m/s
A litre petrol contains 8.888watt hour of energy. Efficiency of a combustion engine is 25%(2222Wh/l) to 30% (2666Wh/l). This would mean a fuel consumption of 1 litre in 1 hour riding at 55 mph thus travelling 55mile on 1 litre (188mpg).
This figure is getting close to my aim of 235mpg, with a careful driving style and a little better Cd as estimeted, average fuel consumption might be 235mpg.
Here is another graph where I have used the same figures for the motorbike (ANF) and streamline. The figures I have used for the ANF with nosecone are; Fa 0.55, Cd 0.65, Mass 220kg, Cr0.01, speed 24.5m/s.
I came to use these figures after performing a top speed test. It tops at 69mph and puts out a maximum power of 6850watt. I have then estimated the engine efficiency on 27% so it should take 3750watt to go 88mph which is the equivalent of 1,56 litre of petrol on 100km (150mpg)
This figure seems realistic, it corresponds with its average fuel consumption.
1,56 l/100km (150mpg) is nice but my aim is 1 l/100km (235mpg). To find out if that is possible I will have build the streamline.
What is good and what has to change
The good things are:
Fuel consumption.
Steering and road holding.
Sitting position and comfort.
Things that need to change:
Automatic clutch has to go.
Front wheel fairing has to go.
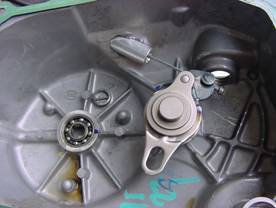
There is no clutch lever on the handlebar, as soon as you touch the clutch pedal the clutch disengages and the next gear is selected. To prevent the engine from stalling there is a second, centrifugal, clutch that disengages if the rpm drops below 2000.
To slow the engine down and make it use less fuel I have changed the sprockets from a 14/35 to a 17/28 combination, the first gear is now almost as long as the second gear used to be. Therefore it takes a long time before the centrifugal clutch finally totally engages.
I would rather have a manual clutch and be in control myself.
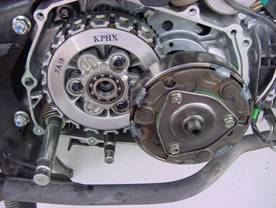
I have welded the centrifugal clutch and taken out some small parts like a small brake shoe that is used to slow the crank shaft down. Then I have drilled a hole in the engine cover welded some home made parts on and connected a cable to the clutch.
It works surprisingly well, light and precise action as if it was oem. I can even hook a new clutch cable in while peeking trough the dipstick hole.

The front wheel fairing has to go to. I was quite confident that it would work and not affect the steering to much.
It turned out to be very scary to ride even with as little as 3 beaufort (about 10mph) side wind I did not dare to go over 35mph. It is a pity I made a mould and all without ever testing with a cardboard model.
Now I am forced to change the design drastically. A non streamlined front wheel would induce far too much drag and is therefore unacceptable. The front wheel needs to be inside the streamline without being connected to it.
I will lower my feet and put them next to the front wheel axle. This will increase frontal area which is bad. The good thing is the slightly smaller side area that might make it handle better in side wind situations.
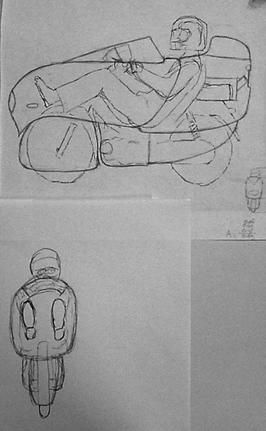
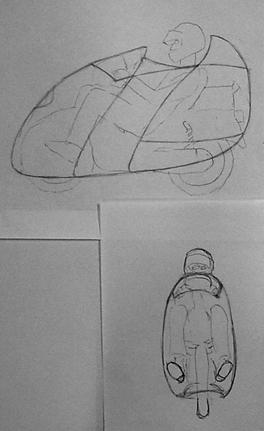
Making the scale model
To get a good impression of what a streamline might look like, I have made a 1:5 scale model.
I have made only half a model and put it on a mirror to take a picture.


The windscreen is not used to look through, it is there to put the headlight and indicators behind it and because it looks better than it does without it.
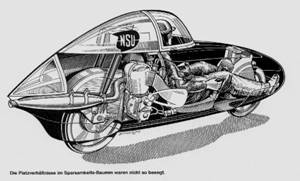
I have used the Go-one http://www.go-one.de windscreen.
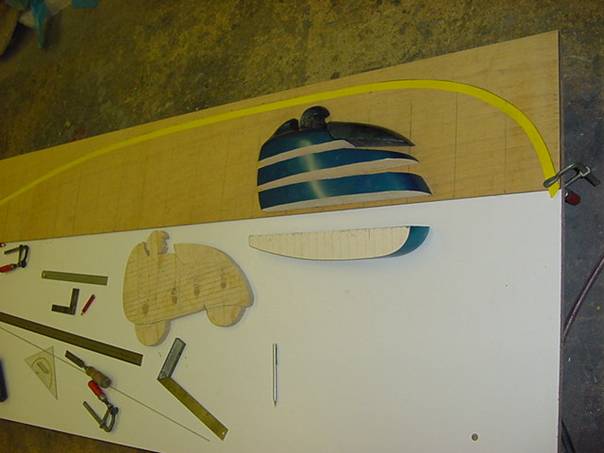
Once I was satisfied with the looks of the scale model I have cut it in slices and used the sections to enlarge it to real live size.
Making the male model
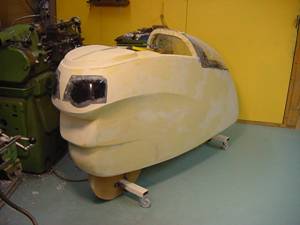
Autumn and winter 2008
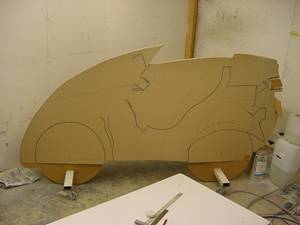
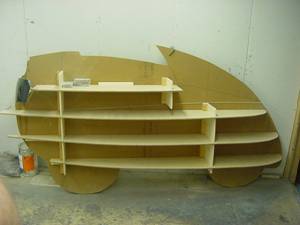
As with the scale model I have started to make one side and only start to make the other side when I am completely happy with the way it looks.
To use less PU foam I made the book shelf with the brick wall on it, this makes it easier to mirror image the other side and to cut out a piece if I am not happy with the way it looks.

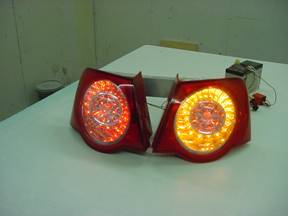
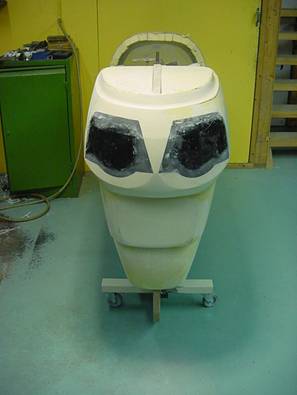
Shape and size of the windscreen and tail lights are fixed, so I start with making a copy of the VW Passat tail lights and a windscreen frame. With this done I can mount them on the profile board and shape the foam to match them.
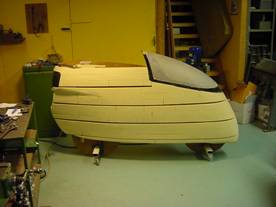
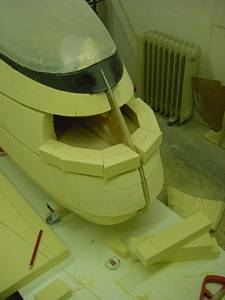
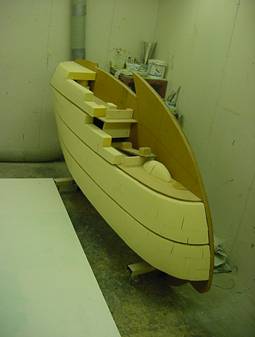
I was not happy about the blunt nose part and the contour line needed some work as well, see the pictures on the left side.
I cut out a part of the nose and made it a bit longer to match the contour line of the windscreen.
Now I can start smoothing the foam with polyester filler.
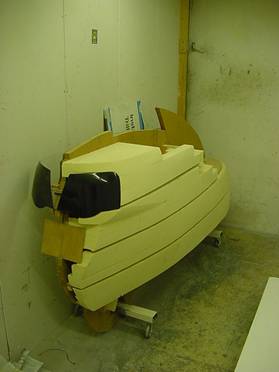
After making some minor changes I now consider the tail of the fairing finished.
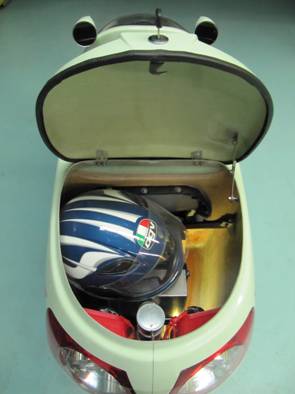
The hatch on the trunk will be made when the streamline is ready for now I only make a groove.
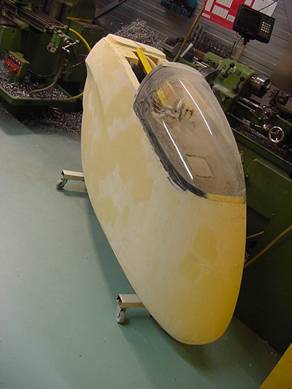
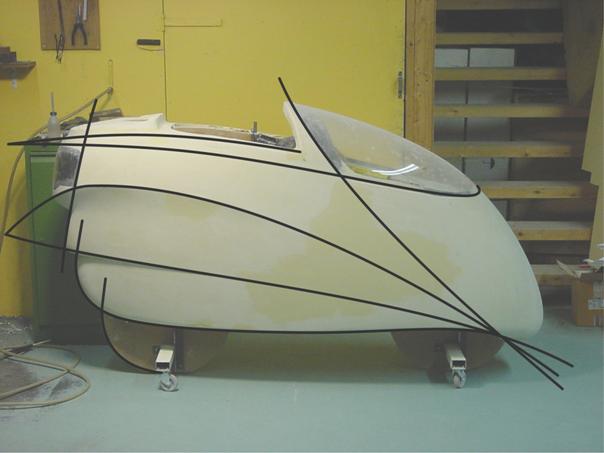
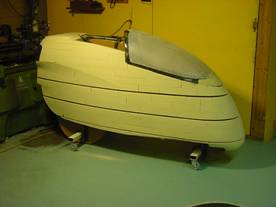
The lines are now in harmony with the shape and each other, I have shortened the windscreen made some lines longer and smoothened others.
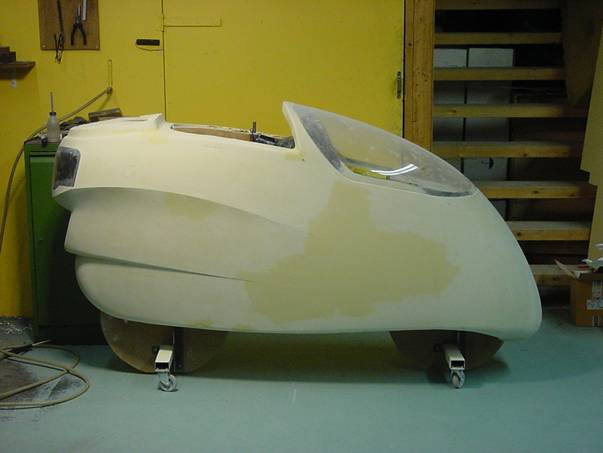
I like the looks, the plug is ready to be sprayed with polyester gelcoat
Smoothing the foam model is a time consuming job, while I am doing this I have a lot of time to think about the details of the design. I am also thinking about a way to get in, using a rail to slide the front of the fairing forward could be a better solution than making a door.
The bottom of the fairing will stay open to be able to put my feet down and balance the machine when I stop and to let air in to cool the engine.
Spring and summer 2009
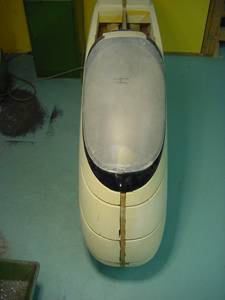
After spraying the gelcoat I will sand and polish it to make the orange peel skin smooth and shiny.
After that I can put the mould release wax on and start building the female mould.
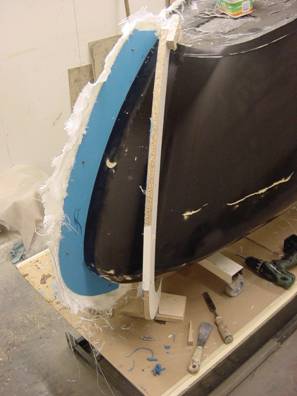

The piece of chipboard to make the flange is removed after the first side of the mould is made.
The second half is laminated against the first one after waxing and placing the positioning dowels.
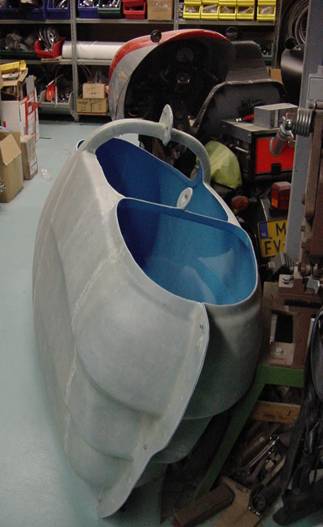
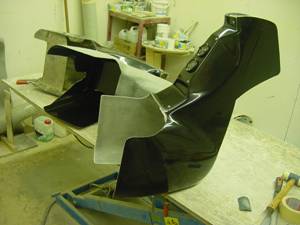
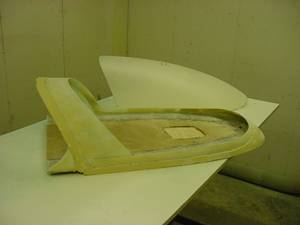
The mould is separated from the plug without any damage to either of them. Now I can use the plug to make the trunk cover on.
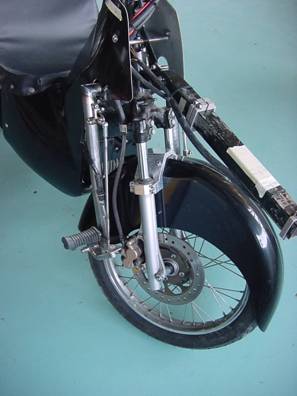
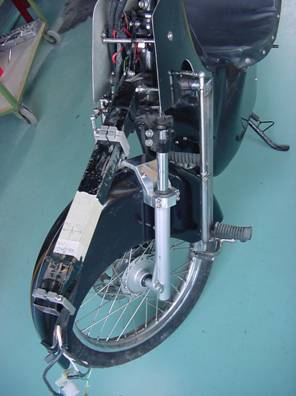
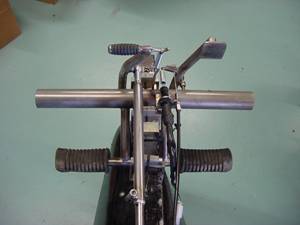
I have welded a tube to the frame in order to position the footrests close to the front axle. The steer has been lowered a bit and the angle of the handlebar changed to a ergonomically better position. I could not do this before because the handlebars would interfere with the legs in the high position.
The brake and shift levers are connected with the rear brake and gearbox by rods and ball joints.
The prolonged fender is designed to keep my feet dry and to prevent them from getting caught in the spokes.
I have milled a ridged aluminium bracket to attach the fender that also serves as a front fork stabilising device. It might improve the handling a bit.
I have made the fender as narrow as possible to create more space for my feet and attached it to the front fork legs instead of the steering head.

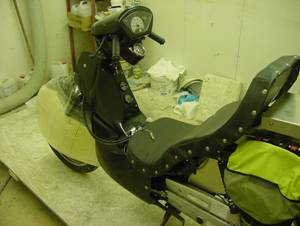
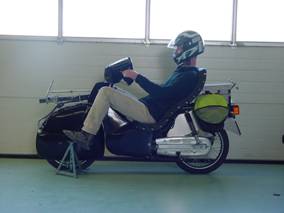
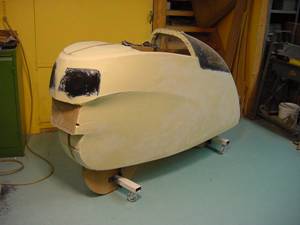
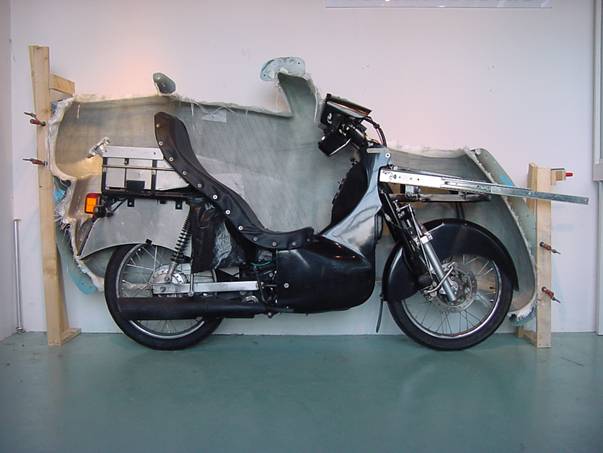
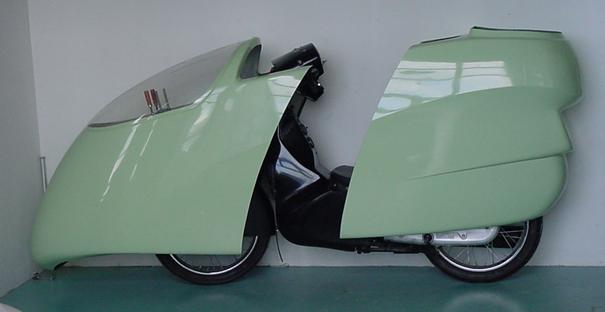
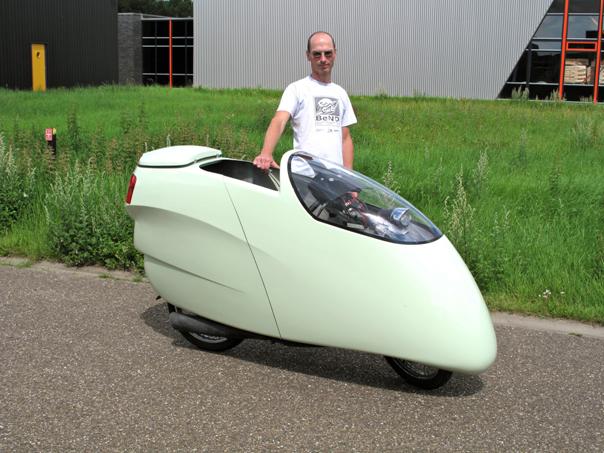
Here you can see how it fits in the streamline. Although the bike appears to be bigger than it is because it stands in front of the streamline, the helmet is positioned as it would be when I wear it sitting in the fairing.
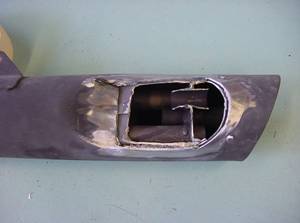
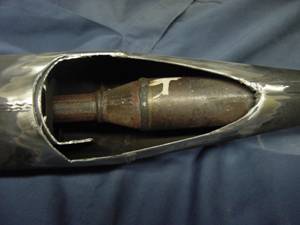
The exhaust is positioned to high to fit inside the streamline. I want to lower it and get it closer to the rear wheel in order to do that I have to make two notches to accommodate the brake lever and the centre stand. The photo on the right shows the catalytic converter.

One part of the streamline is taken out of the mould, the other is still in the mould to protect it while I place the bike against it. Now I must think of a way to mount the streamline on the bike.
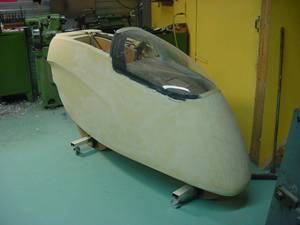
Here you see the new frame extension and the drawer rail attached to it. The triple rail with ball bearings extends to twice the original length.
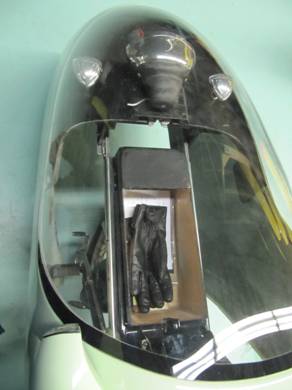
The space above the front wheel and between the two rails provides room for a luggage compartment of about eight inches wide.
The rail extends 18 inches providing enough room for easy entry. Now I will have to make the front and tail part connect without rattling using rubber cones and strip.
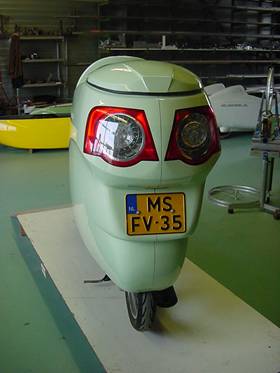
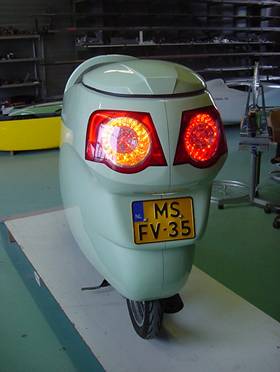
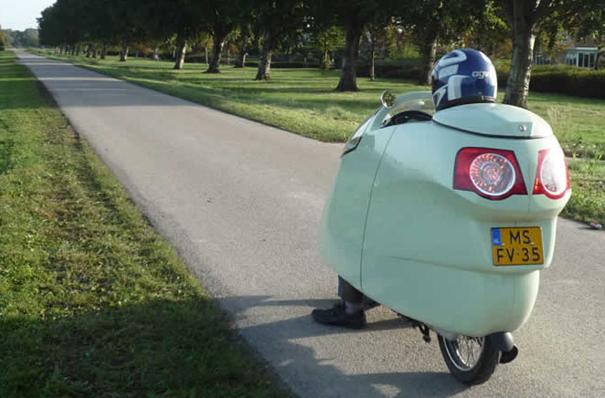
The tail with the lights all connected the indicator lighting up as orange. The mould and cover to fit the luggage compartment are finished.
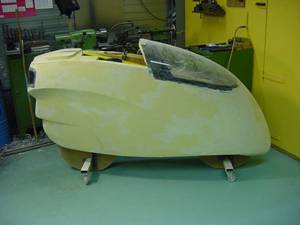
Progress is somewhat slower during the summer months, but I am getting really close now to the first test ride. Wiring, lights and other details take a lot of time though, and I want it all to work before I do the test drive.
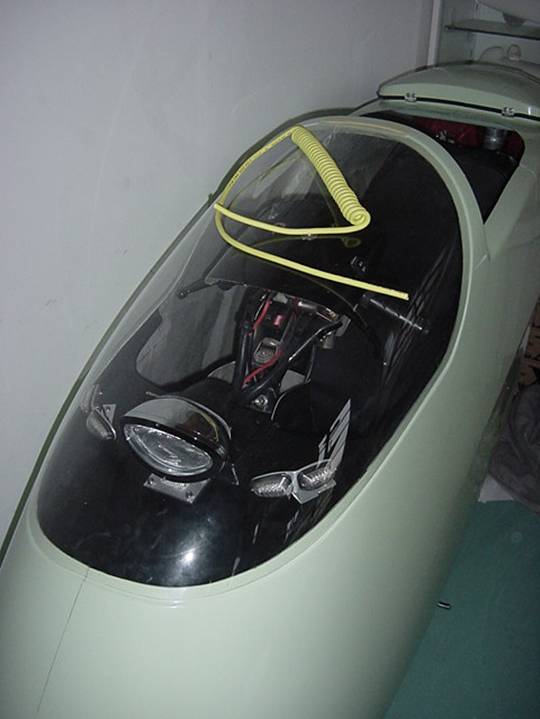
The headlight, indicator lights and the lock are installed. The locking mechanism of the original seat could be used, the key operated part will be used to lock the luggage compartment cover.
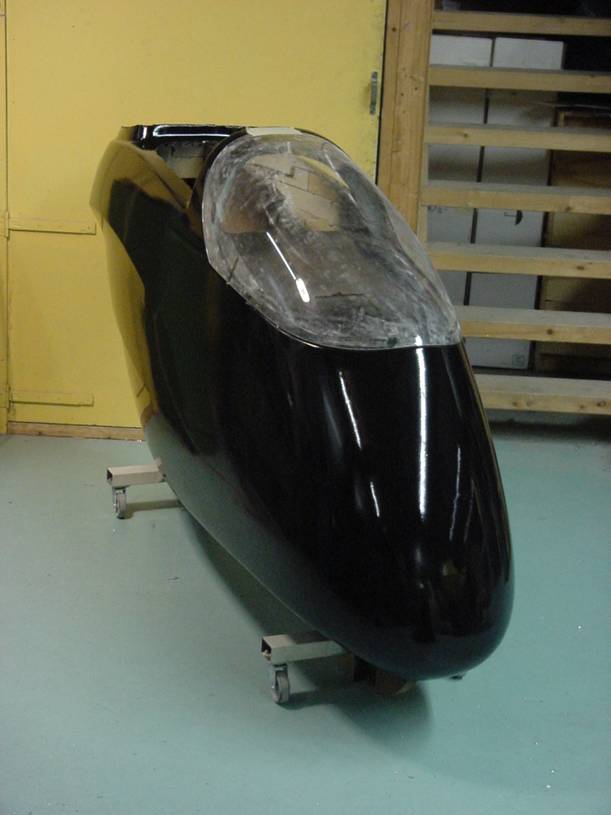
The yellow spiral cord will be used to finish the wiring of the front part. After that the windshield can be glued on and the handlebars narrowed by one inch while they are touching the windshield now when the steer locks.
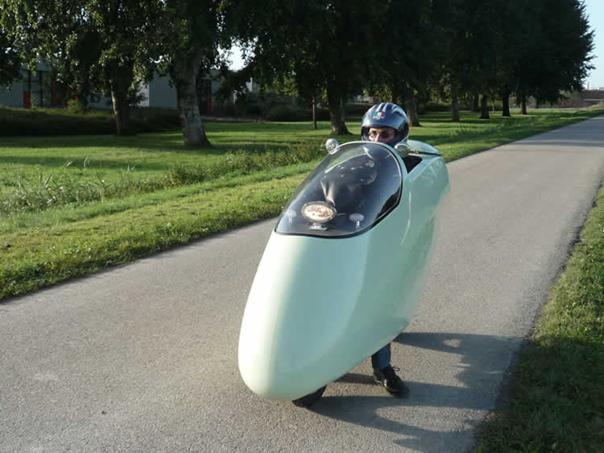
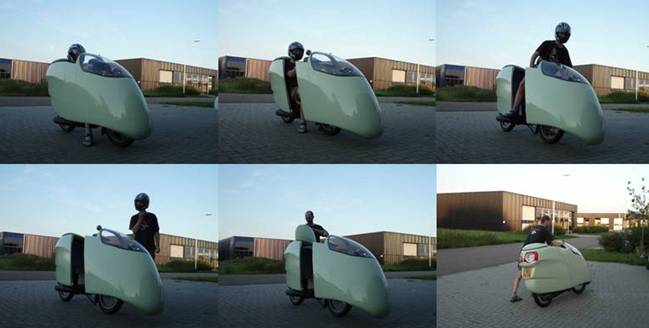
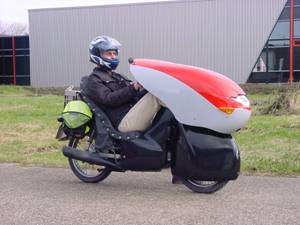
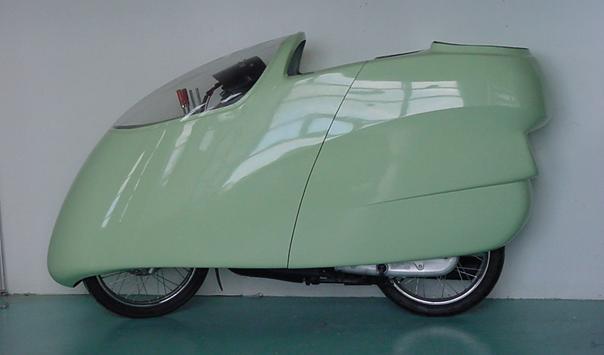
It is on the road!
A 40mph side wind is no problem, more than that might be tricky but that I will have to find out. Engine noise is stronger inside the streamline, but there are no rattles only the engine hum. Seating position is very comfortable and the pressure of the wind on your body is just not there.
I will have to ride it for a few hundred miles before I can say anything about the mpg.
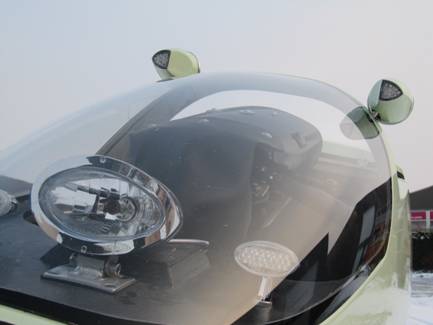
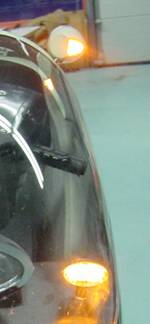
The mirrors are now mounted, they will have to be streamlined though.
The weight of the bike with streamline is 319lbs, about 88lbs more than the standard bike. I have not tried to build a lightweight streamline because I think the weight will make it more stable in side wind situations.
I consider the mpg of the first 4,39 litre with the full streamline to be very good. I have ridden the bike at its 85mph top speed on the highway and through town in heavy traffic and on country roads at 55mph. I am sure that the bike will do 235mpg when I ride it at a steady 55mph.
Later I have made a round trip on the highway of 160 miles in an attempt to proof that the bike is able to do 235mpg (100km on 1 litre).
It did not do this; it did only 214mpg riding about 55mph.
There was a wind of approximately 25mph and temperature was 54 F.
With perfect weather, no wind, plus 70 F and some fine tuning, it might be possible to get to 235mpg, but it will not be easy.
Well, 214mpg is not that bad after all.
Tire testing
In order to get to 235mpg one day I might be able to make some aerodynamic improvements, but I can more easily lower the rolling resistance (Rr).
Rr of a standard bike at 55mph is less than 5% of total resistance. But now that it is streamlined it is about 25%.
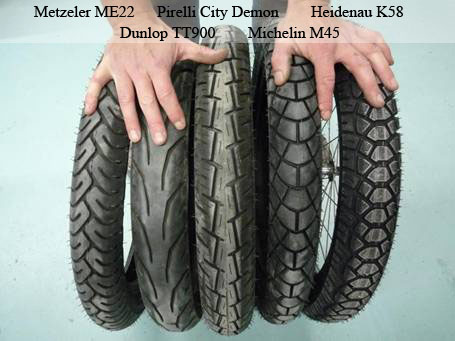
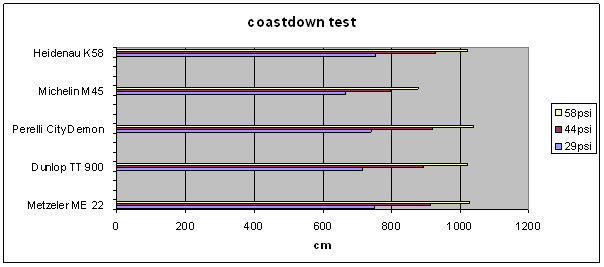
If it is possible to lower Rr by 20% the fuel consumption would go down by 5% at 55mph. There might exist such a difference between tires, to find that out I bought four tires to do a coast down test.
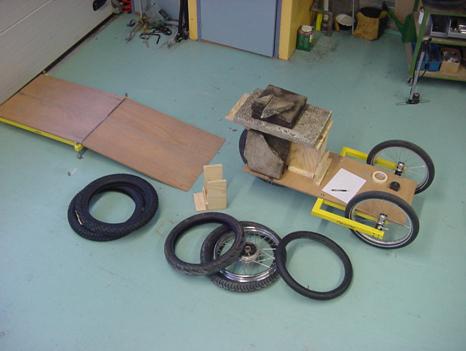
I have built a wheel from a motorcycle rim and a bicycle hub to fit in my coast down cart with platform that I occasionally use to test bicycle tires. I have added a wooden construction to be able to put a 220lbs load on the rear wheel while the front only carries 33lbs. This 33lbs is 13% of the total weight but with all tires on 58psi and the bicycle tires in front having less than half the Rr of the motorcycle tire (the cart rolls more than twice the distance with three bicycle tires)
The front tires add 6% or less to the total Rr, to keep things simple I will not take this in the equation.
The Rr of the motor cycle tires turns out to be quite similar, the only tire that rolls considerably less distance is the Michelin.
All tires roll about 35% better when inflated to 58psi in stead of the recommended 29psi. To just inflate the oem Dunlop tires to 58psi would surely reduce fuel consumption. But it would probably give me less grip when cornering. I think the tires can handle that pressure even though some of them are marked with a maximum load at 40psi.
The coast down tests have been performed on a smooth concrete floor, on tarmac the tires roll about 15% less far. The Dunlop tire has been used and might therefore have less Rr than a new one, the other ones are all new.
It is very easy to calculate the coefficient of rolling resistance with a low speed coast down test like this one. If the cart rolls 1500cm from a plateau of 15cm height the Crr is 15/1500=0,01
All tires roll about 750cm at 29psi and therefore have a Crr of 0,02 that is twice as much as the 0,01 that I have used in my former calculations. Even when inflated to 44psi it does not get much better than 0.017 and that is 2,5 times the Crr of a low Crr car tire.
These motorbike tires not radial tires made for low Crr but nevertheless this is disappointing to me and there is not much that I can do about it.
With my recently acquired knowledge I will adjust the figures for my future calculations.
Links
http://www.craigvetter.com Inspirerende site met o.a. het verslag van het ombouwen van een Honda Helix scooter tot stroomlijn en de zuinigheids wedstrijden van de jaren tachtig.
http://www.analyticcycling.com/ForcesPower_Page.html Uitstekende online rekenmodule voor lucht- rol en andere weerstanden.
http://www.home.zonnet.nl/Stroetmann44/second.htm Over het verbruik van zijn Kawa 305 en de theorie van de verbrandingsmotor.
http://www.schultzengineering.us/Aero.htm Over aërodynamica en benodigd vermogen bij motorfietsen.
http://www.spritmonitor.de/de/uebersicht/18-Honda/0-Alle_Modelle.html?fueltype=2&vehicletype=2 Uitgebreide database met brandstof verbruik gegevens van auto en motorfiets.